


Single Centrals Restorations
Restoring a single maxillary central incisor is widely considered one of the most technically demanding procedures in all of restorative dentistry. Unlike a multi-unit anterior case, where restorations are designed together and small variations can be absorbed across multiple teeth, a single central restoration must precisely replicate a natural tooth sitting right next to it. The human eye is acutely sensitive to asymmetry in the anterior region. Even minor differences in value, incisal translucency, or line angles are immediately visible.
At Burbank Dental Lab, our Smiles by Design ceramic team routinely works on single central cases, and the most consistent lesson we have learned over decades of doing this work is straightforward: the difference between a first-time success and a remake almost never comes down to material selection or lab technique alone. It comes down to the completeness of the information the dentist provides before fabrication begins.
Why Single Central Restorations Are Clinically Different from Everything Else
In posterior restorations or even multi-unit anterior cases, the dental lab has room to make judgment calls. Shades can be blended. Small discrepancies in contour are rarely visible. But a single central has no margin for approximation. The restoration sits in direct comparison with its mirror image, a natural tooth, under scrutiny from every angle, in every light, at every conversation distance.
Esthetic success depends on getting multiple variables right simultaneously:
Solving for one while approximating another is not enough. All of them have to align at once. This is why single central restoration cases require a higher level of case communication than virtually any other restoration we fabricate.
The Real Reason Single Central Restorations Get Remade
Most single central failures are not material failures or laboratory errors. They are information failures. When a case arrives at the dental lab without a stump shade, with a shade taken after dehydration, without adequate photography, or without any reference to what cement will be used, the dental lab technician is left to interpret. In a single central case, interpretation leads to remakes.
In a single central case,
interpretation leads to remakes.
The most common breakdowns we see are:
Each of these gaps independently increases remake risk. Together, they make achieving first-time success very difficult, regardless of how skilled the ceramist is.
A Case That Got It Right:
Dr. Matthew Christie and the Fractured #9 Veneer
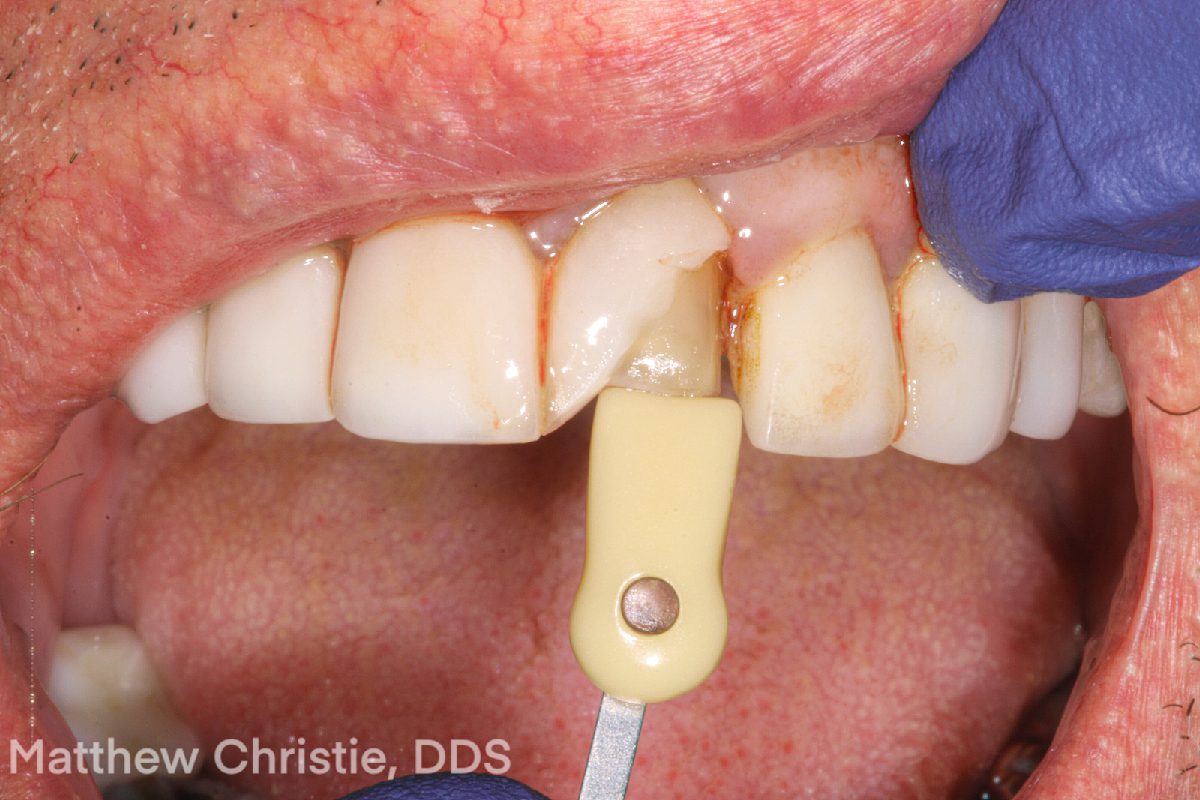
Burbank Dental Lab had the privilege of working on a single central case with Matthew Christie, DDS, of James Island Family, Cosmetic, and Implant Dentistry. The patient presented with a fractured #9 veneer that had been placed approximately 15 to 20 years prior. The adjacent central (#8) and the surrounding dentition were intact.
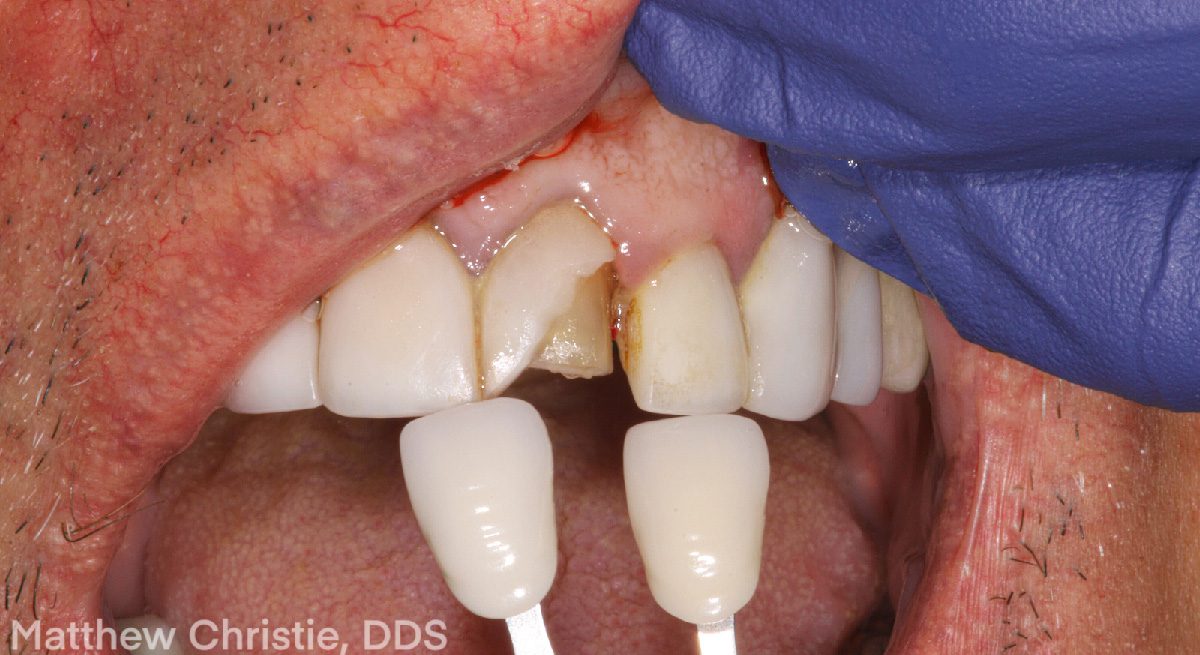
In cases like this, preparing both centrals is often the recommended course of action. Working with two restorations allows the dental lab to design them together, significantly reducing the risk of mismatch. However, after consulting with the patient, Dr. Christie indicated that the patient wished to replace only the fractured #9 veneer. The decision to proceed with a single unit was entirely reasonable, but it raised the clinical stakes considerably. Success would depend on precision in every step and complete information from the clinician.
This case was completed successfully in a single attempt. Not because the result was lucky, but because Dr. Christie provided every piece of information the dental lab needed to fabricate with confidence, not guesswork.
FREE TO DOWNLOAD – SUCCESS GUIDES


DOWNLOAD A GUIDE
The Clinical Protocol That Makes Single Centrals Predictable
Take the Shade at the Start of the Appointment
Tooth shade changes within minutes of isolation. Dehydration causes the enamel to whiten significantly, and a shade taken under those conditions will not reflect the true resting color of the tooth. The shade must be captured at the beginning of the appointment, before preparation begins, with the tooth hydrated, in natural or consistent operatory lighting, and with the shade tab positioned in the same plane as the tooth, with the incisal edges aligned.
In Dr. Christie’s case, the shade was taken correctly and photographed alongside the tab for dental laboratory reference. That photograph alone eliminated a significant variable in fabrication.

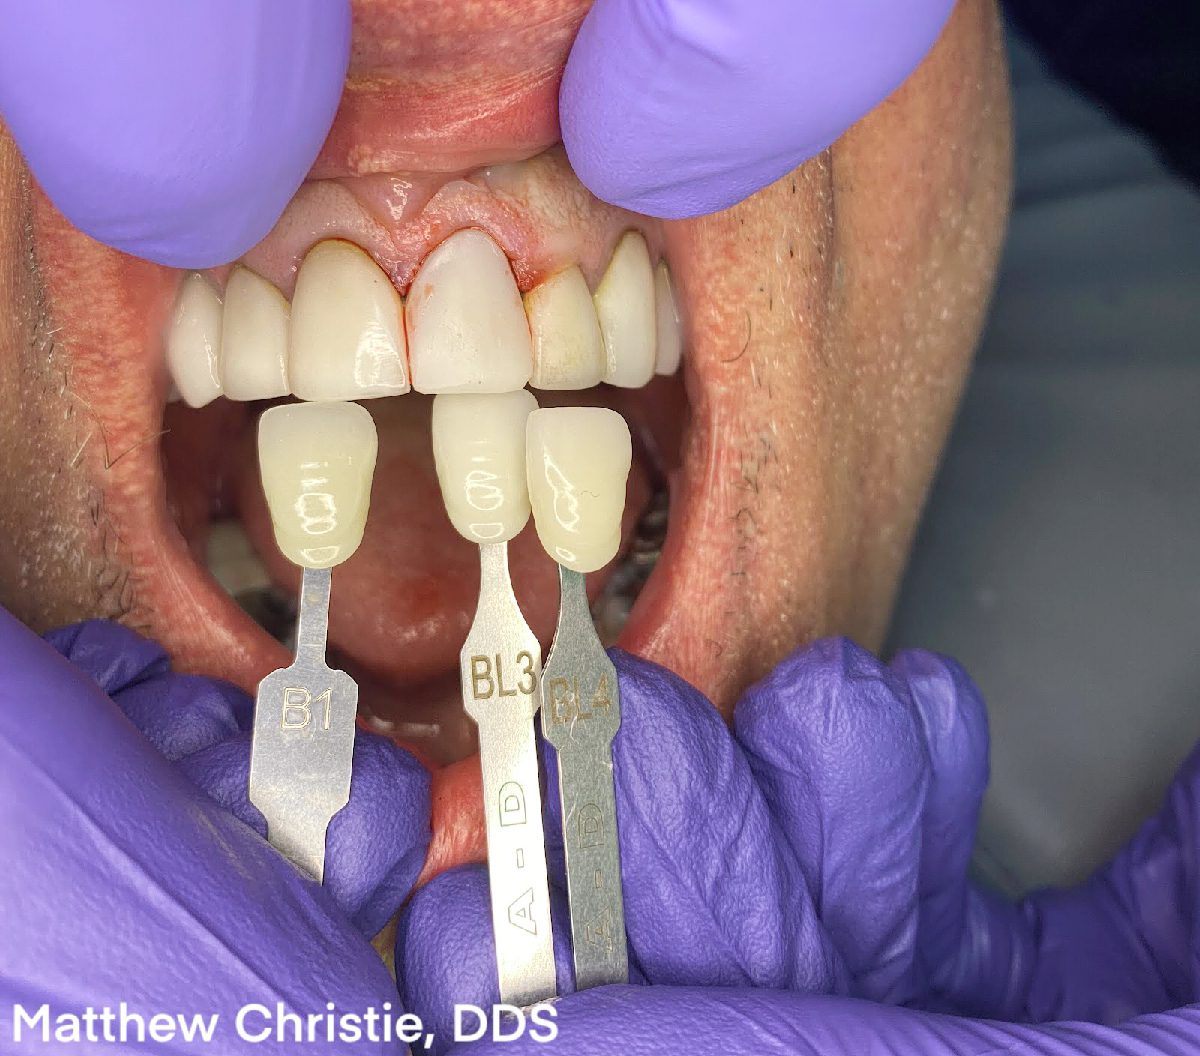
When in doubt between two adjacent shades, the lighter option is the better choice. It is far easier for the laboratory to add depth than to reduce value after the restoration has been fabricated.
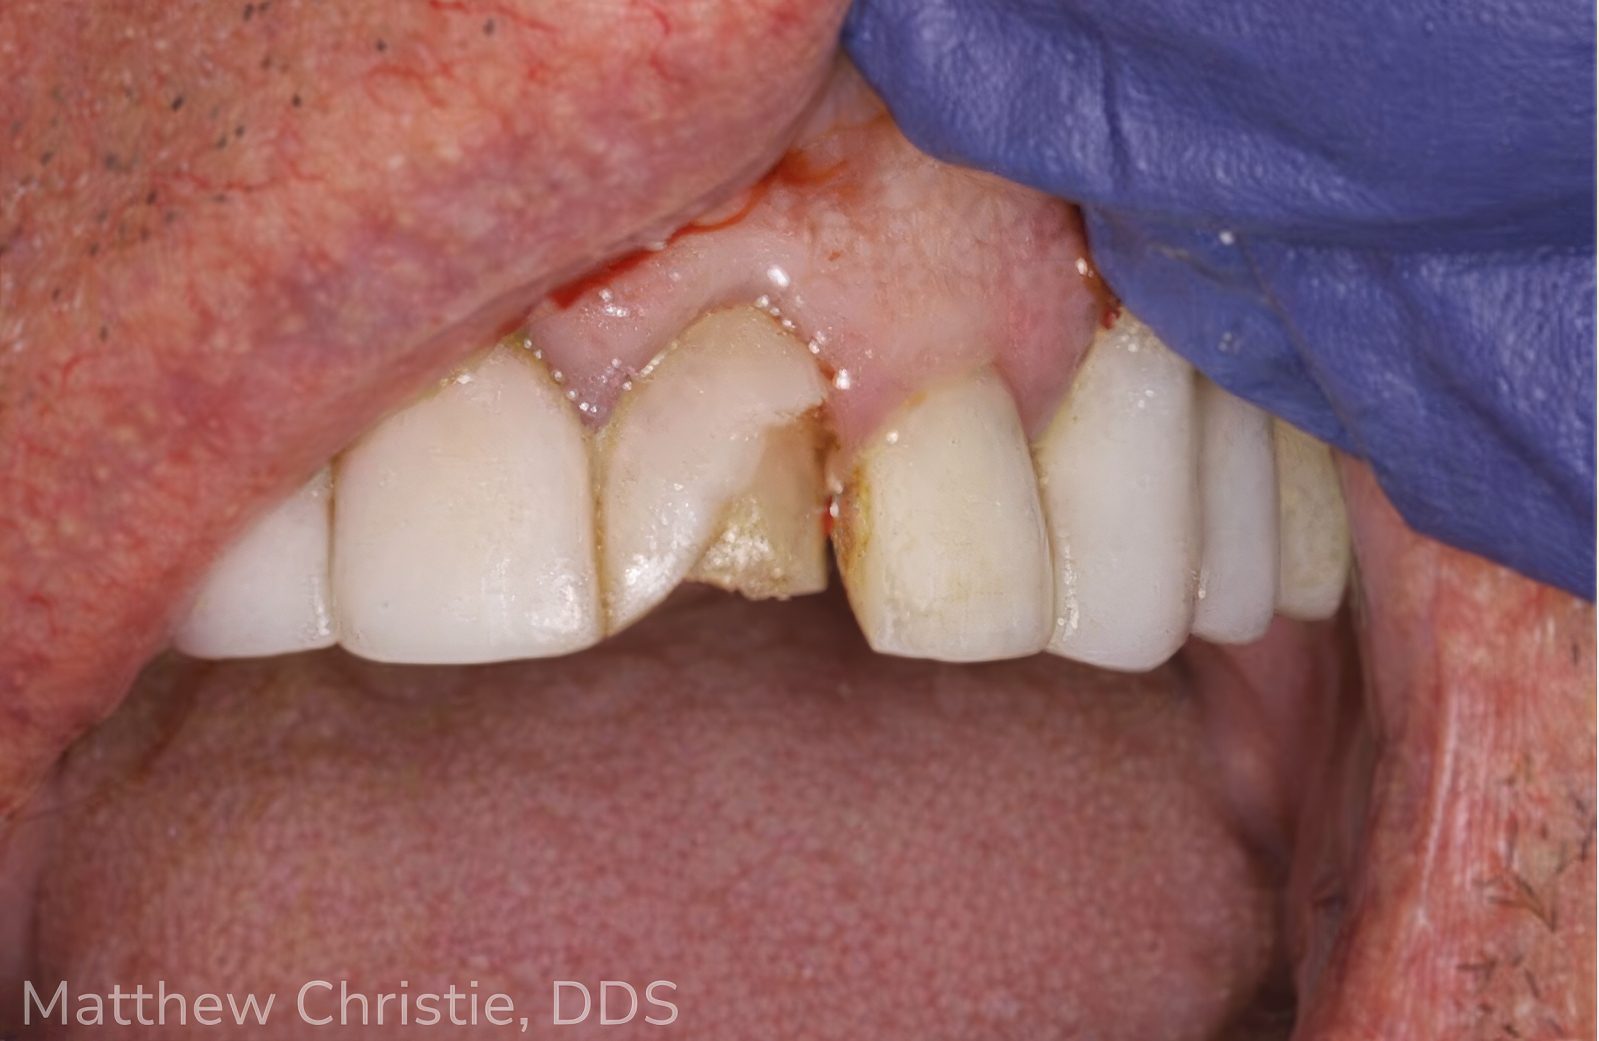
The Stump Shade Is Not Optional
One of the most overlooked variables in single central cases is the prepared tooth color. After preparation, the underlying dentin is exposed, and its color directly influences the final appearance of the restoration, especially in thinner ceramics, where light transmission through the restoration interacts with what is beneath it.
Dr. Christie took the stump shade after preparation and documented it as ND3. This information allowed the Smiles by Design team at Burbank Dental Lab to create a stump die in that exact color, which was used both during fabrication and during quality control to verify that the restoration would achieve the correct value and translucency over that specific underlying shade.
Without that number, material selection becomes a guess. The ingot opacity, the degree of layering, and the cement shade selection all flow from knowing what the prepared tooth looks like. With it, those decisions become precise.
Send the Fractured Piece When You Have It
In this case, Dr. Christie was able to send the chipped portion of the original #9 veneer to the laboratory. This is an underutilized strategy that provides direct insight into what the previous restoration looked like—its shade layering, translucency, and thickness. It functions as a physical reference point that no photograph can fully replicate.
When a fragment is available, always send it. The information it contains is irreplaceable.
3 STEPS TO
PHOTOGRAMMETRY SCANNING

WE HELP YOU GET IT RIGHT
EVERY TIME
STEP 1
Burbank Dental Lab implant scan specialist provides the special scan bodies for insertion in the patient’s newly placed implant sites.
STEP 2
Scan Bodies are removed and special healing abutments are placed on the implant sites. Soft tissue can now be scanned with an intra-oral scanner.
STEP 3
The data from both scans are then sent to the dental lab. The ICam4d data and soft tissue scans are aligned to become a high-precision dental model.
Document Preparation, Design, and Cement Selection
The amount of tooth reduction and available space governs what the dental lab can achieve with any given material. Thin preparations constrain the ability to block out underlying color and limit the range of translucency that can be built into the restoration. The lab needs to know what it is working with in order to make appropriate material decisions.
Cement shade is equally important and is frequently not communicated. In thin restorations, resin cement color can shift the value and chroma of the final result in ways that are not visible until cementation, at which point adjustment is no longer possible.
Documenting the intended cement and providing that information at case submission allows the dental lab to account for that optical interaction during fabrication and quality control.
Material Selection: Why IPS e.max Remains the Right Choice for Most Single Central Restorations
For single central veneers and anterior crowns, lithium disilicate, specifically IPS e.max, remains the preferred material in most cases. It offers the right balance of translucency, layering capability, and clinical reliability. The wide range of ingot shades and opacity levels available in the e.max system allows our ceramists to select the precise starting point for each individual case, rather than having to work against a material that is inherently too opaque or too translucent for the preparation at hand.
Many of Burbank Dental Lab’s layered restorations are fabricated using IPS e.max and are particularly well-suited for single central cases that require strategic block-out of underlying color while maintaining a natural, vital appearance.
For cases involving veneers, where minimal preparation has been performed and only modest shade adjustment is needed, e.max veneers offer an exceptionally thin, translucent option. The right choice between these depends on preparation depth, the degree of color correction required, and the stump shade, which is another reason information is so fundamental to material selection.
Material selection is not a decision the lab should be making in isolation. It should be a clinical-laboratory conversation based on documented case specifics.
What Happens in the Dental Lab When Complete Information Is Provided
When a case arrives with complete documentation, the Smiles by Design team can work with precision from the first step. Digital impressions are used to capture morphology and occlusion. The contralateral central is referenced for symmetry, line angles, and surface texture. The stump die is created in the documented color and used throughout fabrication and quality control. The restoration is designed, pressed, and layered with the cement shade and preparation depth in mind.
The difference between a fabrication process that feels like informed craft and one that feels like estimation is entirely a function of the information that arrived with the case. Our ceramists are skilled, but skill cannot substitute for data. With the right data, we consistently produce results that exceed expectations on the first attempt.
Our ceramists are skilled,
but skill cannot substitute for data.
With the right data, we consistently produce results that exceed
expectations on the first attempt.


Managing Patient Expectations: An Essential Part of the Protocol
Even with perfect communication and a skilled dental lab, patients need to understand what they are consenting to when they elect to restore a single central. Matching a natural tooth is not a guaranteed outcome on the first attempt in every case. It is a high-probability outcome when everything is done correctly, but patients who don’t understand the inherent challenges of single central matching can interpret a second appointment as a failure, even when the clinical work is sound.
Before preparation begins, take the time to educate the patient. Explain that the adjacent tooth is a living, dynamic structure with characteristics that cannot always be fully replicated on the first try.
Explain the variables involved:
Patients who understand the process are more likely to participate productively in the shade selection appointment and are better prepared to respond constructively if adjustment is needed.
Patient satisfaction in single central cases is not only a function of esthetic outcome. It is also a function of expectation management from the very beginning of the case.
The Try-In: Do Not Skip It and Do Not Approximate It
Before final cementation, a proper try-in is one of the most critical and most frequently underperformed steps in single central cases. The purpose of the try-in is to evaluate color, value, and integration with the adjacent dentition under conditions that replicate the final cementation as accurately as possible.
This means using try-in paste that matches the intended final cement—not water, not glycerin. Water and glycerin do not replicate the optical properties of resin cement, and a restoration that appears to match under glycerin may not match at cementation. Dr. Christie’s try-in confirmed a successful match, and the patient was happy with the result. That verification step was not incidental. It was an essential checkpoint that confirmed every prior decision had been correct before anything was made permanent.
The try-in also provides an opportunity to evaluate the restoration in natural light, in the patient’s actual oral environment, and with the patient’s own visual feedback. That information matters.

FREE TO DOWNLOAD – SUCCESS GUIDES
DOWNLOAD A GUIDE
Single Central Restorations: Case Submission Checklist
The following checklist represents the minimum documentation for a predictable single central outcome. Cases submitted with all of these elements allow the Smiles by Design team to work with precision rather than approximation.
This is not an exhaustive list for complex cases, but it covers the information gaps responsible for the majority of single central remakes.
Predictable Results Come From Complete Information
A single central case is not a test of material science. It is a test of communication. When the information provided to the laboratory is complete, accurate, and well-documented—the way Dr. Christie’s submission was—the ceramist can execute with confidence. The result is a restoration that integrates naturally with the adjacent dentition on the first attempt, a satisfied patient, and a clinical experience that builds trust in the restorative relationship.
When information is incomplete, the best lab in the world is working with one hand tied behind its back.
The Smiles by Design team at Burbank Dental Lab works closely with dentists to help ensure that nothing is missing before fabrication begins. If you have a single central case coming up, or if you have experienced more remakes than you’d like in anterior esthetic cases, we invite you to reach out.
Call us at (800) 336-3053, use the chat on our website, or request a fee schedule to get started. Let’s get it right the first time.
FAQ

REQUEST THE BURBANK DENTAL LAB FEE SCHEDULE
REQUEST FEE SCHEDULE
Thank you Dr. Matthew Christie
“At Burbank Dental Lab, I am very impressed with the attention to detail and easy communication. I use Burbank Dental Lab even though I’m on the East Coast because the results are always predictably great and I know my patients are receiving a high-quality restoration that I can be proud of.” — Dr. Matthew Christie, DDS.
DR. MATTHEW CHRISTIE, DDS
We want to thank Dr. Matthew Christie for choosing Burbank Dental Lab for his patients and for providing us with another case study for our readers.


