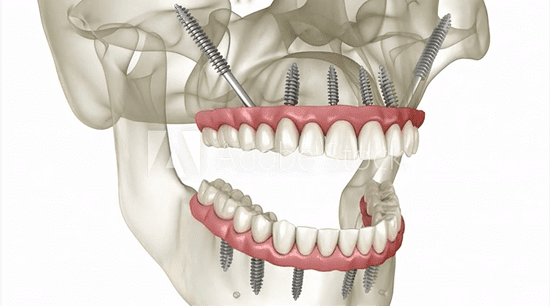
Multi-unit abutments are specialized implant components that connect dental implants to a prosthetic restoration.
REQUEST FEE SCHEDULE
When it comes to full-arch restorations and complex implant cases, multi-unit abutments (MUAs) play a crucial role in achieving long-term stability, function, and esthetics. Understanding how these abutments work can help you make informed decisions and improve case outcomes and patient satisfaction.
What Are Multi-Unit Abutments?
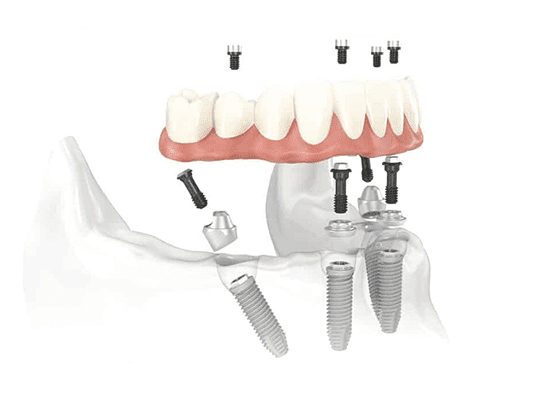
Multi-unit abutments are specialized implant components that connect dental implants to a prosthetic restoration. Unlike standard abutments, which are typically designed for single crowns or small bridges, MUAs allow for better angulation correction and support for full-arch restorations.
Key features of multi-unit abutments:
MUAs act as an intermediary between the implant and the final restoration, helping to distribute occlusal forces evenly and ensuring a predictable outcome.
Speak to Technical Support
Call us at
Benefits of Multi-Unit Abutments
1. Correct Implant Angulation
Not all implants can be placed at a perfect angle due to bone density, anatomy, and nerve positioning. Multi-unit abutments enable angulation correction, ensuring the prosthetic fits correctly and appears natural.
2. Improved Load Distribution
Not all implants can be placed at a perfect angle due to bone density, anatomy, and nerve positioning. Multi-unit abutments enable angulation correction, ensuring the prosthetic fits correctly and appears natural.
3. Cement-Free Restorations
Cemented restorations have a higher risk of peri-implantitis due to cement remnants. Multi-unit abutments facilitate screw-retained prosthetics, making maintenance easier while reducing the chances of infection.
4. Easier Prosthetic Retrieval
With screw-retained restorations, dentists can remove and adjust the prosthesis without damaging the implant or surrounding tissue. This makes repairs, hygiene maintenance, and adjustments far more convenient.
5. Better Soft Tissue Adaptation
MUAs create a more stable and hygienic emergence profile, which is beneficial for long-term soft tissue health. This helps prevent inflammation and recession around the implants.
Applications of Multi-Unit Abutments
Multi-unit abutments are most commonly used in:
They are an essential component in full-mouth reconstruction, especially for patients transitioning from traditional dentures to implant-supported solutions.

Speak to Technical Support
Call us at
Choosing the Right Multi-Unit Abutments
When selecting multi-unit abutments, consider the following:
1. Implant System Compatibility
Not all MUAs fit every implant system. Ensure that the abutments you choose are compatible with the implant brand and platform being used.
2. Angulation Needs
Evaluate the angulation of the implants to determine whether you need 0°, 17°, or 30° abutments.
3. Prosthetic Material
Whether using zirconia, PMMA, or titanium hybrid bars, choosing the correct MUA will ensure optimal fit and durability.
4. Soft Tissue Considerations
MUAs come in various cuff heights, which should match the patient’s tissue thickness for the best esthetic and functional results.
FREE TO DOWNLOAD – SUCCESS GUIDES
DOWNLOAD A GUIDE
Why Choose Multi-Unit Abutments?
At Burbank Dental Lab, we have completed thousands of cases using multi-unit abutments, which ensure superior fit, durability, and esthetics. Our solutions are:
We collaborate with dentists and specialists to create high-quality, functional restorations that enhance patient outcomes. Whether you need zirconia bridges, hybrid bars, or PMMA provisional restorations, our expertise ensures seamless integration with multi-unit abutment-supported prosthetics.
BURBANK DENTAL
LAB WAS VOTED
TOP 5 DENTAL LABS
IN AMERICA
SOURCE: DENTAL COUNTRY™
Steps for Using Multi-Unit Abutments in Implant Dentistry
Multi-unit abutments (MUAs) are essential components in implant dentistry, particularly for full-arch restorations like All On X and implant-supported bridges. They allow for optimal angulation, soft tissue management, and prosthetic stability. Below are the key steps to successfully placing and using multi-unit abutments in implant restorations.
Speak to Technical Support
Call us at
Burbank Dental Lab offers a full range of custom abutments with SMART 1 Implant Abutments to suit any clinical need.
1. Case Planning and Assessment
Before placing multi-unit abutments, a comprehensive diagnostic evaluation is necessary. This includes:
2. Selecting the Right Multi-Unit Abutments
Choosing the correct abutment height, angulation, and platform is essential for achieving proper prosthetic fit and function. Considerations include:
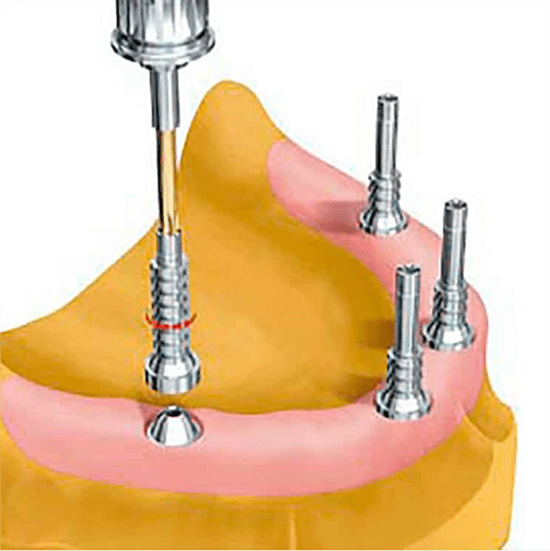
3. Attaching the Multi-Unit Abutments
Once the implants have been placed and adequately integrated, the next step is securing the multi-unit abutments:

