


Veneers have become a permanent solution for achieving the coveted “Hollywood Smile.”

REQUEST THE BURBANK DENTAL LAB FEE SCHEDULE
REQUEST FEE SCHEDULE
Veneer Prepping Essentials
Porcelain veneers have revolutionized cosmetic dentistry, transforming countless smiles over the years. Initially, this restoration was developed for actors to enhance their screen appearance. Today, veneers have evolved into a permanent solution for achieving the coveted “Hollywood Smile.”
Achieving optimal results with porcelain veneers hinges on meticulous preparation tailored to each patient’s needs. At Burbank Dental Lab, the veneer preparation process should match the patient’s needs and goals. It should also consider the current condition of their teeth.
Understanding the Purpose of Veneer Preparation
Veneer preparation is essential and serves multiple critical functions:
BURBANK DENTAL LAB WAS VOTED
TOP 5 DENTAL LABS
IN AMERICA
SOURCE: DENTAL COUNTRY™


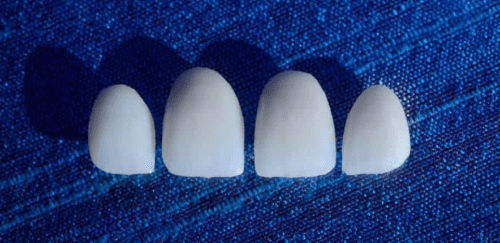
What are the Types of Veneers Available?
Porcelain veneers typically fall into three main categories. At Burbank Dental Lab, we offer three specialized veneer solutions:
Each is designed to meet the specific needs of different cases. Choosing the right veneer type is important, as is knowing the right preparation technique. This helps create a stable foundation for long-term success. Veneer preparation usually has three main approaches: minimal, moderate, and aggressive.
Each method is designed for the patient’s dental needs and aesthetic goals.

Porcelain Veneer Best Practices
A diagnostic wax-up is an essential step in the planning and execution of porcelain veneer cases. It serves as a blueprint for the final restoration, allowing both the clinician and the patient to visualize the anticipated outcome before any irreversible preparation is done.
The wax-up provides critical insights into function, occlusion, and esthetics, ensuring that the proposed design aligns with the patient’s facial features and smile dynamics.
Additionally, it helps identify any necessary adjustments in tooth positioning, contour, and symmetry before committing to the final restorations. Skipping this step increases the risk of unpredictable outcomes, patient dissatisfaction, and potential functional issues.
Beyond planning, the wax-up also serves as the foundation for a prototype. This direct intraoral mock-up allows the patient to experience their new smile before committing to the final veneers. This provisional stage is crucial for patient approval and functional evaluation.
Transferring the wax-up design into the mouth using a silicone index and temporary material allows the patient to assess factors such as length, shape, phonetics, and overall esthetics in real time. This step also allows adjustments based on patient feedback before proceeding with the definitive ceramic work.
Key Benefits of a Diagnostic Wax-Up and Prototype
Once this step is done, preparation guidelines can be provided to ensure the teeth are prepared appropriately to achieve the approved final results.

Mastering the Art of Veneer Preparation
The debate over veneer preparation is ongoing, with varying opinions on the ideal method. Ultimately, the best approach depends on the patient’s needs and goals. Below, we explore three preparation styles and their ideal applications.


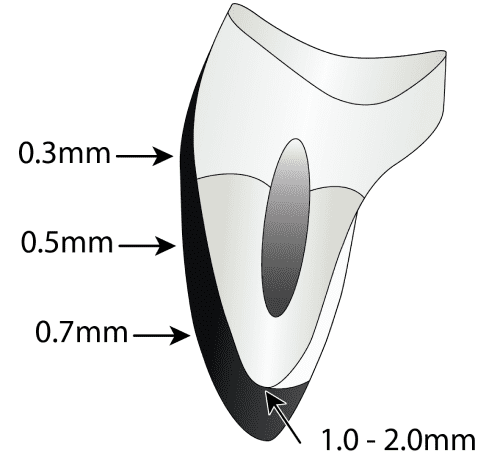
Minimal-Prep Veneers
Minimal-prep veneers are ideal for patients seeking subtle enhancements without drastic changes to their natural teeth.
Indications:
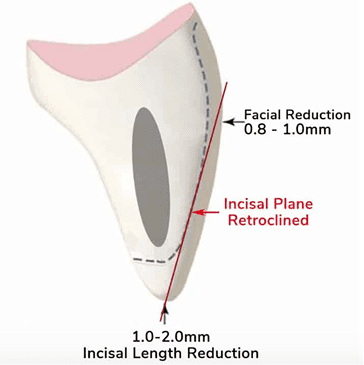
Preparation Guidelines:
Preparation Guidelines:
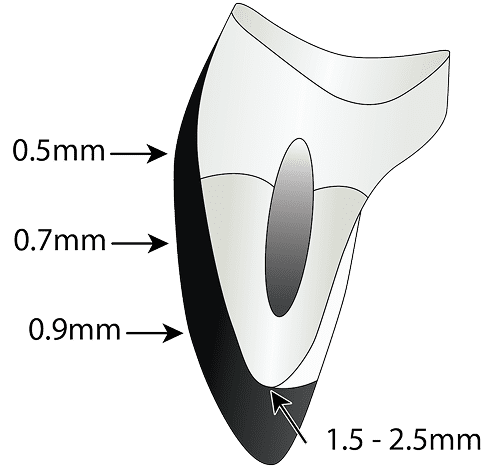

Moderate Veneer Preparation
This technique is the most common approach, allowing for moderate shape and shade alterations while maintaining a conservative approach.
Indications:
Preparation Guidelines:
Best Material Options:

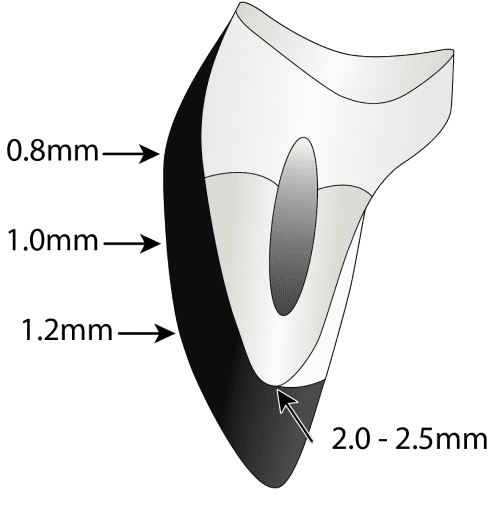
Aggresive Veneer Preparation
Patients with significant alignment concerns, spacing issues, or extreme discoloration, require a more comprehensive preparation approach.
Indications:
Preparation Guidelines:
Best Material Options:
Choosing the Right Veneer Material
The success of a veneer case depends on the material selection, as different ceramics offer varying strengths and aesthetic qualities. The most common materials include:
IPS e.max (Ivoclar Vivadent)
Feldspathic Veneers
Best Practices for Veneer Preparation
To ensure the success and longevity of dental veneers, consider the following guidelines:
These practices are essential to improve veneer longevity and ensure a successful outcome.
FREE TO DOWNLOAD – SUCCESS GUIDES


DOWNLOAD A GUIDE
Patient-Centered Veneer Treatment
A successful dental veneer case hinges on a patient-focused approach. It is crucial to understand the patient’s aesthetic desires, functional needs, and long-term expectations.
The clinician bridges the gap between the patient’s vision and the dental lab’s capabilities, ensuring a customized and precise outcome.
By working closely with an experienced cosmetic dental lab like Burbank Dental Lab, dentists can confidently deliver veneers that provide long-lasting beauty and function.
Ready to elevate your cosmetic dentistry practice? Partner with Burbank Dental Lab to craft high-quality, custom veneers that exceed patient expectations.


