impression
impression Troubleshooting Guide - Burbank Dental Lab

Written by Andrew Sedler

Written by Andrew Sedler

Written by Andrew Sedler

Impression Troubleshooting Guide
The Foundation of Successful Restorative Cases

REQUEST FEE SCHEDULE

DOWNLOAD RX FORM

SCHEDULE A PICK-UP

Close Search

What can we help you with today?

All Content
Products
Videos
Articles
Resources
Events
Total Results: 0
Product Results: 0
Video Results: 0
Article Results: 0
Resources Results: 0
Event Results: 0
Search Time: 0ms
impression troubleshooting - best dental lab usa

The foundation of any successful restorative case begins with an accurate, detailed impression. At Burbank Dental Lab, we see hundreds of impressions every day, most of which are of very good quality. However, we also see impressions that have issues. There are also impressions that look fantastic but have hidden problems that cause challenges for both parties. We have found that even the most experienced dental practitioner can encounter difficulties when making an impression. Even the slightest inaccuracy is amplified as the restoration progresses from model to wax/digital mockup, to milling, to final seating.

What You Will Learn In This Article

  • Highlight several of the most common problems that we see in the lab.
  • Present how to identify the problem before sending it into the lab.
  • Show how to avoid the root causes of common problems.

Problem 1: Inadequate Margins

Impression problem: Inadequate margins

Causes & Solutions

Solutions:

  • Ensure good tissue management - no gingivitis or bleeding sulcus. 
  • Double cord technique may alleviate.
  • Use gingival retraction clay/paste such as Espasyl-Kerr, Access-Centrix Inc., Astringent Retraction Paste-3M.

Solution:

  • Keep the mix-tip permanently immersed in the paste to avoid the formation of air bubbles. Apply a liberal amount of wash material into the sulcus. Start from the bottom up and cover the whole abutment tooth with the syringing material. Always keep the tip in close proximity to the surface.
Solution:
  • Keep tip continually submerged within impression material and sulcus.

Solution:

  • May require a wash material with a higher tear strength.
  • Additional tooth preparation in a margin area to create a more adequate sulcus impression material width.

Problem 2: Air Bubble On Margin

Air bubble on margin

Voids on the margin or occlusal of an impression can compromise the restoration’s fit and function. When voids occur on occlusal surfaces, it is not possible to properly articulate models.

Causes & Solutions

Solution:
  • Keep tip continually submerged within impression material and sulcus
  • Use a stirring motion while syringing, making sure to keep the syringe tip immersed to avoid trapping air.

Blood/saliva contamination around preparation

Figure 3

Solution:
  • Ensure good tissue management, with no gingivitis or bleeding sulcus. 
  • Double cord technique may alleviate.
  • Use gingival retraction clay/paste such Espasyl-Kerr, Access-CentrixInc., Astringent Retraction Paste-3M. (Figure 4)

Using gingival retraction clay

Figure 4

Solution:

  • Follow the manufacturer’s working time specification.

Problem 3: Tight Crowns

Causes & Solutions

  • Early removal of the impression tray from the mouth.
  • A poor bond of the material to the tray, or seating an impression tray with material that is partially set. 
  • Inserting the impression tray after it has begun to set. 
Solution: 
  • Closely follow the recommended working and setting times and always use a VPS tray adhesive according to instructions.

Problem 4: Short Crowns

Causes & Solutions

Solutions:

  • To address this issue, use custom or rigid trays — preferably metal.  (Figure 5)
  • Short crowns can also be due to teeth coming into contact with the tray during impressioning; confirm that teeth do not touch the tray.


Rigid trays

Figure 5

Problem 5: Drags / Pulls In Impression

Causes & Solutions

Drags and pulls

Figure 6

 
Solutions:
  • Position the tray before seating, and use a slow, steady, vertical seating motion. Drags or pulls can result when the tray is placed and seated in one motion. To avoid drags, carefully position it in the mouth before seating it slowly and carefully. Avoid contact of teeth with the tray.
  • Be sure to adhere to the manufacturer's directions, as seating after the material has begun to set can cause this problem as well.

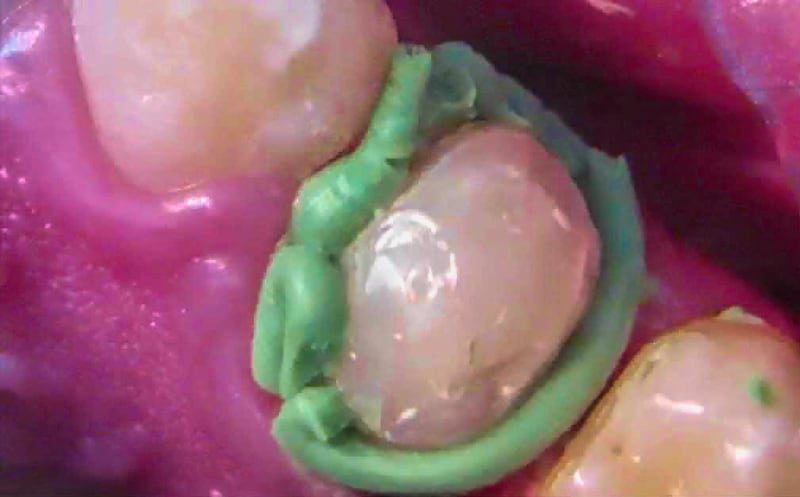
Problem 6: Surface Inhibition - (Figure 7)

Surface inhibition

Causes & Solutions

 
Solutions:
  • Avoid this problem by waiting to fabricate the temporary crown until after the final impression has been made.  
  • Use an alcohol wipe to remove the air-inhibited layer on any composites, adhesives, or core buildups in the impressioning area.  
  • Use non-latex or powder-free gloves. 
  • Rinse retraction cord thoroughly before removal to eliminate sulfur-based contaminates from hemostatic agent or glove.
Burbank Dental Lab

GUIDELINES FOR A GOOD IMPRESSION

  • 1

    Uniform, homogeneous mix of material

  • 2

    The tray is sufficiently filled with impression material

  • 3

    Thoroughly-applied tray adhesive

  • 4

    Rigid, sturdy impression tray

  • 5

    No voids or pulls on margin detail

  • 6

    Detailed margins with no tears or rough surfaces

  • 7

    No tray show-through of the impression material

  • 8

    Good blend between heavy body and light body materials

  • 9

    A strong bond between impression material and tray

  • 10

    No tooth contact with the tray

  • 11

    Complete information about the impression material used provided to the dental laboratory

Burbank Dental Lab is dedicated to facilitating your practice success, and we make every effort to communicate with our clients regarding what we observe regarding impressions and other patient records. Our goal is to be an integral part of your dental team, to create Smiles By Design® together with you.

Burbank Dental Lab
Burbank Dental Lab Laminated Success Guide

REQUEST YOUR FREE IMPLANT SUCCESS GUIDE BELOW

Success Guides

We Appreciate You Sharing This Product

SHARE X LinkedIn
Previous Post:

NEED HELP CHOOSING THE PERFECT PRODUCT?

Would you like to speak with an expert now?

SPEAK TO TECHNICAL SUPPORT

Would you like to schedule a call?

SCHEDULE A CALL

Speak to Technical Support

Call us at

(800) 336-3035

Schedule A Call

Slide 1

Fabrication
of the future
is here!

Burbank Dental Lab has three new state-of-the-art Carbon M2 printers. We are very excited about the options that these cutting-edge printers will allow us to offer our dental clients. Here are some of the advantages that these printers will begin to deliver to you and your dental practice.

Our New
State-Of-The-Art
3d Printers

Carbon offers a highly dependable 3D manufacturing solution for many dental applications with its breakthrough Digital Light Synthesis™ technology, enabled by a wide range of dental materials.

a new baseline
for innovation
in fabrication.

Burbank Dental Lab has the next generation of Carbon DLS™. Meet our new Carbon M3 and M3 Max printers. These advanced printers enhance fabrication possibilities using Digital Light Synthesis™ technology, enabling us to provide quality and innovation for our clients.

Carbon M3 Printer - Burbank Dental Lab - CA

Meet Our New
next generation of carbon DLS™
M3 Max Printers

The M3 printer is the cutting edge of DLS printing with a true 4K light engine. We save time and improve quality with Automated Print Ppreparation which ensures high-quality assurance and results.